Every Exchange administrator has probably faced this scenario at least a few times: You have an email address, and need to find out – who does it belong to?
Back when Exchange was new to you, you probably started by making educated guesses using the Exchange Management Console or Exchange Admin Center. “It looks like a user, so let’s look at users. Hmm, not there, I guess I’ll check groups. Not there either. I guess I’ll check shared mailboxes…”
You’ll find it eventually, but for me this is a much quicker problem to solve. You load up Exchange PowerShell…
PS> Get-Recipient 'something@example.com'

Name                  RecipientType
----                  -------------
Something Something   MailContact
…and now you know it’s a Mail Contact. (Or a Mail User, or a Distribution Group, etc.). Easy. As far as I know, there is no GUI way in Exchange on-prem or Online that is anywhere near as fast as this (assuming you’ve streamlined your connecting to Exchange PowerShell). The Get-Recipient cmdlet allows you to easily search all Exchange recipient types (user, group, shared mailbox, contact, …) by various identities (Name, Display name, Alias, Distinguished name, Email address, GUID).
This isn’t the only scenario where we need to search for multiple types of object, so I like to extend this further. I like to create cmdlets that will search multiple products (or directories or whatever you want to call them) and output a merged object.
For example, in the past I have done this with Active Directory and Exchange on-prem, which worked something like this:
PS> Get-ADUserExMailbox -Identity "john@example.com"

Name         Display Name   Email Address     ADUserFound     MailboxFound
----         ------------   -------------     -----------     ------------
John Smith   John Smith     john@example.com  True            True

PS> $Variable = Get-ADUserExMailbox -Identity "john@example.com"
PS> $Variable.ADUser

DistinguishedName : CN=John Smith,CN=Users,DC=example,DC=com
Enabled           : True
GivenName         : John
Name              : John Smith
ObjectClass       : user
ObjectGuid        : e1418d64-096c-4cb0-b903-ebb66562d99d
SamAccountName    : j.smith
SID               : S-1-5-21-2889043008-4136710315-2444824263-3544
Surname           : Smith
UserPrincipalName : j.smith@example.com
It’s a cmdlet that looks up both the AD User account and its corresponding Exchange mailbox, returns a combined object, displaying some common attributes and with the full original objects as members.
Such a cmdlet has many advantages:
- It can combine the flexibility of both of the source cmdlets.
For example you could look up an AD user by email address (which you can’t with
Get-ADUser, unless the email happens to match the UPN), or look up an Exchange Mailbox by SID (which you can’t withGet-Mailbox). - Coded well, you can be sure you are operating on the correctly corresponding objects.
For example in casual use, we may use the “Name” attribute when using
Get-ADUserandGet-Mailbox. But you may get an AD user and a mailbox that do not correspond to each other! The Name of an AD User can be the Alias or Display Name of an entirely unrelated Mailbox. The UPN of an AD User could be the email address of a different Mailbox. And so on.If we create this cmdlet, we can match objects using non-human-friendly attributes that are completely unique / unambiguous, such as GUIDs.
- It can be reused in scripts whenever you need to operate on both objects.
Unix philosophy.
In this multi-part series, I’m going to go through the creation of such a cmdlet, which we will call Get-MITUser. This time not for AD Users and Exchange Mailboxes, but for Office 365’s MsolUsers and Exchange Online’s Mailboxes. I may later go on to add Skype for Business Online’s CsOnlineUsers, and perhaps AD Users again for DirSync / Azure AD Connect environments, but for now we’re focusing on just the two: Office 365 and Exchange Online.
Once completed, Get-MITUser will function something like below. (Please forgive me for not using the exact correct flowchart symbols)
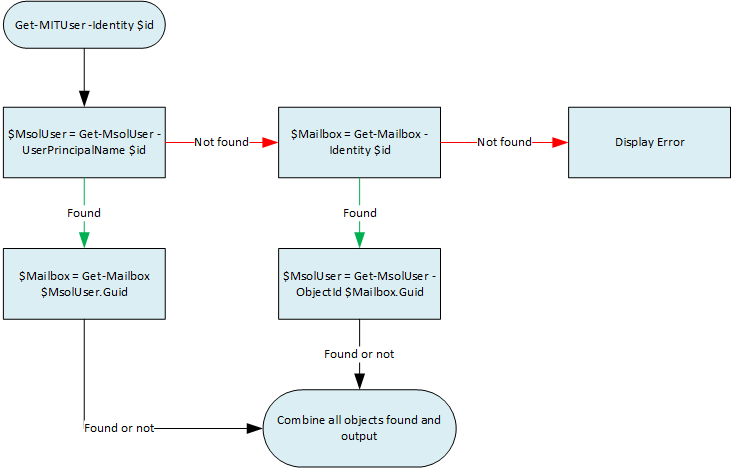
Stay tuned for Part 2.
Related Posts
 All-in-one Get-User cmdlet: Part 7 – Skype for Business Online
- All-in-one Connect-365 cmdlet: Part 1 – MSOnline, Exchange Online, Skype for Business Online
- All-in-one Get-User cmdlet: Part 6 – Formatting & Mailbox Statistics
- All-in-one Get-User cmdlet: Part 5 – Handling Edge Cases
- All-in-one Get-User cmdlet: Part 4.5 – Source Control Detour with TortoiseHg and Bitbucket
- All-in-one Get-User cmdlet: Part 4 – Basic Function Put Together